A lot of my photos are taken in “portrait” or
vertical orientation, for whatever reason. Recently, I was working on a slideshow movie, and I needed them horizontal. I
could just leave the sides black, but it made the slideshow seem “jumpy” and took
away from the overall effect. Then I saw
the evening news shows, and how they often present a vertical picture in the
center of the screen, and the sides are filled in with the same photo blurred
and stretched, like this:
I researched a number of photo editing programs but couldn’t
find a free or inexpensive one that promised to create the “blur background” I
wanted to use.
Then I remembered that Microsoft Word has a number of
special effects options and decided to take a look. Eureka!
The solution was on my computer all along!
Here’s how to create a blurred photo for FREE as long as you
have Microsoft Word on your computer.
Step 1
Be sure the photo you want to use is saved to
your computer and you know which folder it is in.
Step 2
Open a new Word document
Step 3
Go to the Insert menu at the top, select “Pictures”
and “From this Device”
Step 4
When the Insert Pictures window pops up, choose
the photo you want. If the photo is very large, use the dots to
resize so you can see it on about half a page.
Step 5
Making sure the picture is still selected, click
on the “Picture Format” menu. From Picture Format, choose “Artistic Effects”. The menu may just show you thumbnails, but if
you hover over each one it will tell you the name of the effect. Choose the one called “Blur”.
Step 6
Your photo is now blurred, but still somewhat recognizable. If you want more blur, choose Artistic
Effects again and then “Artistic Effects Options”. This will give you a slider bar that says “Radius”. Slide the bar up or down to make the photo
more or less blurry.
Step 7
Now, if you want to use the photo as a
horizontal background, you can resize it before saving. For example, if your project is on a 16:9
aspect ratio, you may want to resize the photo to 6”wide by 3.375” tall. If your project is 4:3 aspect, you can simply
change it to 4” wide by 3” tall. You can
do this by choosing the photos and dragging it out to the shape you want, or
right click the photo and choose “Size and Shape” to type in precise height and
width.
Step 8
To save your creation, right click on the
picture and choose “Save as Picture” from the menu that pops up. On the “Save as Type” line, you will probably
want to save as a JPEG, but you can also choose PNG, GIF, or TIFF. Be sure to choose a different name than your
original photo so you don’t save over it.
Part 2 for slideshows....
If you’re working with a movie program that allows backgrounds
to vertical photos, you can simply use your new blurry photo as the background
to the original vertical one.
For my free
movie program (MiniTool MovieMaker), I couldn’t do that. Therefore I used the Paint program on my
computer to combine the two into one picture.
Step 1
Be sure the blurry photo you created above is on
your computer and you know which folder it is in.
Step 2
Open the Paint 3D app (you can also use original
Paint but these steps may not be exactly correct)
Step 3
Click on Menu in the upper left, then choose Insert.
Step 4
When the window pops up, locate the correct
folder and choose your blurry photo
Step 5
The blurred photo should now be the Paint
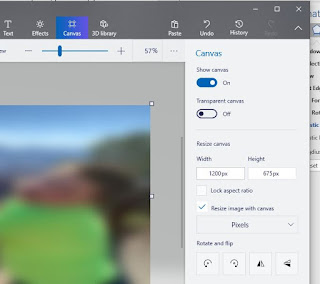
project, and should fill the whole Paint canvas. (If it doesn’t, click on the “Canvas” menu at
the top, verify “Resize image with Canvas” is OFF and resize the canvas to come
exactly at the edges of your photo.)
Step 6
Verify that your Canvas (and photo) are at the
height to width ratio you will need for your project. For example, my MovieMaker program uses a
16:9 ratio. I imported this photo with a
4:3 aspect ratio so I need to change it.
I click on “Canvas” and check the “Resize Image with Canvas” option to
ON. Make sure “Lock Aspect Ratio” is not
checked (OFF). Then change the size of
the canvas to 1600 x 900, or the equivalent.)
Step 7
Once you know that the blurry background photo
is the right shape (aspect ratio), go to the Canvas menu and be sure that “Lock
Aspect Ratio” is ON (checked) and “Resize image with canvas” is turned off or
unchecked.
Step 8
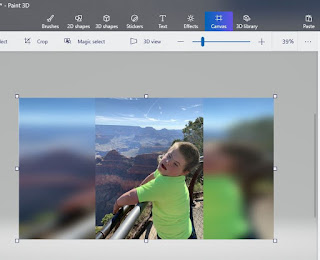
Go to menu and insert the regular (not blurry)
photo you want to use. It may come in as very large and change the
canvas shape, so don’t panic. Use the
dots at the corners to make it smaller, then pick it up and place it over the
top of the blurry photo. Try to get it
to the same height as your blurry photo exactly, but still the correct vertical
shape. Your blurry photo will show on
both sides. Note: If you lose the resize
handles before you get it correct, you will have to click “Undo” and start over
at the beginning if this step 8.
Step 9
If your Canvas got larger, be sure to set the edges again so that they are aligned with the edges of your blurry photo, to make the entire image a vertical one.
Sept 10
Save the finished photo back into your project
folder by clicking "Save as Image" from the menu, and choose JPEG as the format. Now you’re ready to go!


Comments
Post a Comment